Handbrake adjustment cost typically ranges from $60 to $150 at a professional mechanic, primarily covering 0.5 to 1.0 hours of labor. However, if the issue involves stretched cables or worn brake shoes requiring replacement, the price can rise to between $250 and $400. For DIY enthusiasts, the cost is negligible, often requiring only basic hand tools.
The emergency brake, commonly known as the handbrake or parking brake, is a vital component of your vehicle’s safety system. While often overlooked until it fails a safety inspection or allows the car to roll on an incline, maintaining proper tension is essential. This definitive guide explores the financial and technical aspects of handbrake adjustment, ensuring you have the knowledge to make informed decisions regarding your vehicle’s maintenance. For other crucial automotive needs like Starter Motor Problems Diagnosis & Repair Auckland, always seek professional expertise.
Understanding Handbrake Adjustment Costs
When you search for “handbrake adjustment cost,” you are likely encountering one of two scenarios: a simple cable slack issue or a mechanical failure within the braking hardware. The price disparity between these two scenarios is significant.
Professional Labor Rates
For a standard manual handbrake system, the adjustment is generally a straightforward procedure. Most professional automotive shops charge an hourly labor rate between $80 and $150. Since a routine adjustment usually takes 30 to 60 minutes, you can expect the base bill to settle around the $60 to $150 mark.
Parts and Component Replacement
If the mechanic discovers that the adjustment nut has reached its limit or the cables are seized, adjustment is no longer an option. You are then looking at repair costs rather than maintenance costs. This can include services similar to Mobile Radiator & Cooling System Repairs, which address critical vehicle systems.
- Brake Cables: $50–$150 for parts, plus 1–2 hours of labor.
- Brake Shoes (Drum-in-Hat): $40–$80 for parts, plus labor.
- Return Springs/Hardware Kits: $20–$40.

Symptoms of a Loose Handbrake: Pulling Up Too High
Before worrying about the cost, it is crucial to diagnose if an adjustment is actually what you need. The most common symptom is the travel distance of the lever itself.
The “Click” Test
In most mechanical systems, the handbrake lever operates on a ratchet mechanism. As you pull the lever up, it clicks. A properly adjusted handbrake should fully engage between 3 and 7 clicks. If you are pulling the handle nearly vertical—often referred to as “hitting the roof”—before the wheels lock, your cable is too loose.
Rolling on Inclines
The definitive functional test involves parking on a slope. If the handbrake is fully engaged but the vehicle still creaks or rolls slightly when you release the foot brake, the holding power is insufficient. This is a critical safety failure that requires immediate attention.
Handbrake Mechanics: Cables, Drums, and Calipers
To understand the adjustment procedure, one must understand the anatomy of the system. Unlike the hydraulic foot brake, the emergency brake is almost always mechanical (except for modern Electronic Parking Brakes).
The Cable System
The lever inside your car pulls a primary cable, which usually splits into two secondary cables via an equalizer bar. These cables run to the rear wheels. Over time, these steel cables stretch under tension, which is why adjustment is a routine maintenance requirement.
Drum vs. Disc Configurations
There are two main types of rear braking systems:
- Standard Drum Brakes: The handbrake cable pulls a lever that physically expands the brake shoes against the drum.
- Disc Brakes with Integrated Drums (Drum-in-Hat): The car has disc brakes for stopping, but a miniature drum brake mechanism inside the rotor hub acts exclusively as the parking brake.
- Integral Caliper Handbrakes: The cable pulls a lever on the disc brake caliper itself, forcing the piston out mechanically to clamp the pads onto the rotor.
Step-by-Step Guide: Cable Tightening Procedure
For many vehicles, specifically those where the brake shoes are not worn down, a simple cable tightening at the lever end is all that is required. This is the “free” DIY method that saves the $100 shop fee.
Warning: Always chock your wheels to prevent the vehicle from rolling, as you will be releasing the handbrake during this process.
1. Accessing the Adjuster
The adjuster nut is typically located directly behind or underneath the handbrake lever. You may need to:
- Remove the plastic trim around the handbrake.
- Open the center console armrest and remove a false bottom panel.
- Remove the ashtray (in older vehicles).
2. The Adjustment
Once exposed, you will see a threaded rod with a nut (usually 10mm or 12mm).
- Release the handbrake lever completely.
- Using a deep socket or spanner, turn the nut clockwise to tighten the tension.
- Tighten it by a few turns, then pull the handbrake lever to test the “clicks.”
- Critical Check: Release the lever fully and ensure the rear wheels can still spin freely. If you over-tighten, the brakes will drag, causing overheating and warping.
Advanced Adjustment: Drum Brake Shoes and Star Wheels
If tightening the cable does not restore holding power, or if the cable adjuster is maxed out, the issue lies at the wheels. For drum brakes and “drum-in-hat” systems, you must adjust the brake shoes directly before tightening the cable.
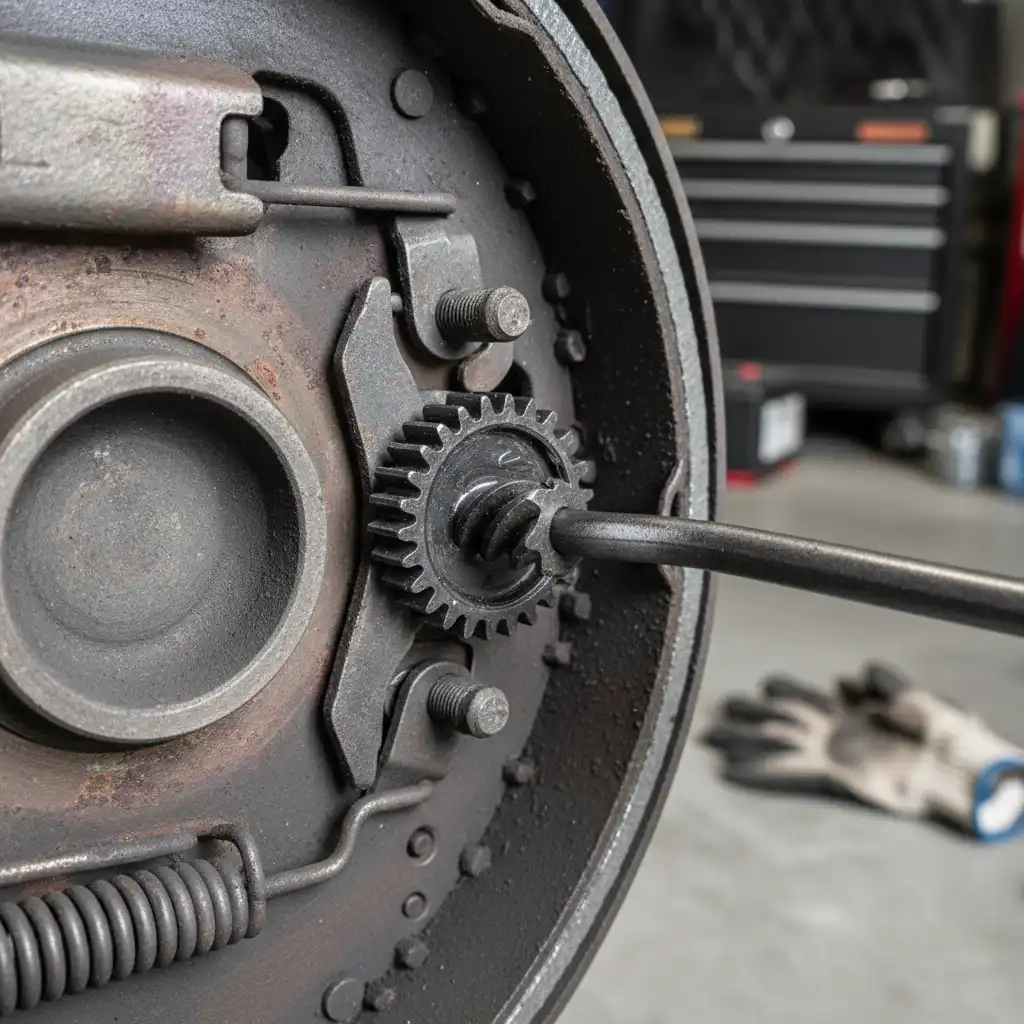
The Star Wheel Mechanism
Inside the drum, there is a threaded adjuster link often called a “star wheel.” As brake shoes wear down, the gap between the shoe and the drum increases. The star wheel must be expanded to push the shoes closer to the drum surface.
The Procedure
- Lift the Vehicle: Safely jack up the rear of the vehicle and support it on jack stands.
- Locate the Access Port: On the back of the brake backing plate, there is usually a small rubber plug. Remove it.
- Adjust the Star Wheel: Using a flathead screwdriver or a specialized brake spoon tool, rotate the star wheel teeth. You will need to determine which direction expands the shoes (often clicking sound is heard).
- The Drag Test: Spin the wheel by hand. Expand the shoes until you feel a slight drag, then back the star wheel off a few clicks until the wheel spins freely again.
- Finalize: Reinstall the rubber plug and lower the vehicle. Now, perform the cable tightening procedure at the lever if necessary.
For more detailed diagrams on drum brake anatomy, Wikipedia’s entry on Drum Brakes offers an excellent technical breakdown.
Electronic Parking Brakes (EPB): The Modern Cost Factor
Modern vehicles increasingly utilize Electronic Parking Brakes (EPB). In these systems, there is no physical lever or cable inside the cabin. Instead, a button activates an electric motor mounted on the rear calipers to clamp the brakes.
Why EPB Adjustment Costs More
EPB systems generally self-adjust. However, when pads are replaced or if the system falls out of calibration, manual adjustment is impossible. It requires a diagnostic scan tool to put the car into “Service Mode” and recalibrate the motor position.
Consequently, the “handbrake adjustment cost” for an EPB system is essentially a diagnostic fee, ranging from $100 to $200, as it requires specialized computer equipment rather than just a wrench.
WOF, MOT, and Safety Inspection Requirements
In many jurisdictions, including New Zealand (WOF) and the UK (MOT), the handbrake is a primary failure point. Understanding these requirements can save you the cost of a re-inspection.
Warrant of Fitness (WOF) / MOT Standards
Inspectors look for three main criteria:
- Reserve Travel: When the brake is fully applied, there must still be reserve travel left in the lever. If the lever hits the end of its track, it fails.
- Balance: The braking force must be relatively equal across both rear wheels. If one cable is seized and only one wheel locks, the vehicle will fail.
- Efficiency: The parking brake must be capable of holding the vehicle stationary on a significant gradient (usually 16% to 20%).
According to the NZ Transport Agency (Waka Kotahi), parking brake performance is non-negotiable for road legality. If your handbrake pulls up too high, adjust it before your inspection date to avoid a fail. For more comprehensive advice on vehicle readiness and safety, consider Preparing for a Road Trip: Roadside Coverage Essentials.
People Also Ask
How many clicks should a handbrake have?
A properly adjusted handbrake should typically engage fully between 3 and 7 clicks. Less than 3 clicks may indicate the brake is too tight and could drag while driving; more than 7 clicks typically indicates the cable has stretched or the brake shoes are worn and require adjustment.
Can I drive with a loose handbrake?
While you can physically drive the car, it is unsafe and likely illegal. A loose handbrake cannot be relied upon in an emergency or to hold the vehicle on a hill. Furthermore, a loose handbrake will result in a failure during mandatory state safety inspections (WOF/MOT).
Why is my handbrake loose after replacing pads?
If you have rear disc brakes with integral calipers, the piston may need to be seated properly. Pump the foot brake several times before pulling the handbrake. If the system uses drum-in-hat shoes, the shoes likely need to be manually adjusted (expanded) to match the new rotor/drum diameter.
How much does it cost to fix a snapped handbrake cable?
Replacing a snapped handbrake cable is more expensive than a simple adjustment. You can expect to pay between $200 and $450 depending on the vehicle. This includes the cost of the cable (approx. $50-$100) and 1.5 to 3 hours of labor, as routing the new cable often requires removing heat shields and interior trim.
Do electronic parking brakes need adjustment?
Generally, Electronic Parking Brakes (EPB) are self-adjusting. They automatically compensate for brake pad wear. However, they may require electronic recalibration using a diagnostic scan tool after brake service or if the battery has been disconnected for an extended period.
Is tightening the handbrake cable enough?
Not always. Tightening the cable at the lever is a valid fix for cable stretch. However, if the looseness is caused by worn brake shoes inside the drum, tightening the cable is a “band-aid” fix. The correct procedure is to adjust the brake shoes at the wheel first, and then fine-tune the cable tension.